How to Publish an App on the Apple App Store
Creating a new app is exciting. But getting that app into the hands of real users isn’t always easy.
First, you need to publish your app to the App Store so it’s available for download.
The two major app stores are the Apple App Store and the Google Play Store—one for iOS and one for Android. But each platform has its own unique guidelines, rules, and submission requirements.
This guide is going to focus specifically on publishing an iOS app to the Apple App Store. Once the app is published here, it can be downloaded on an iPhone or iPad.
It’s worth noting that Apple is very particular with its submission guidelines. You’ll need an Apple Developer account, and the App Store listing must match the app’s functionality. There are lots of other small details that Apple takes into consideration before they’ll approve apps.
That’s because Apple wants to protect its users. Apple wants its user base to feel comfortable knowing that any app downloaded from the Apple App Store is safe and won’t break their devices.
Read on to learn how to publish an app on the App Store with ease.
Key Takeaways
- Developer Account: You must join the Apple Developer Program ($99/year) to submit apps.
- Strict Guidelines: Apps must meet Apple’s five core pillars: Safety, Performance, Business, Design, and Legal.
- Technical Tools: Xcode is the primary tool used to archive and upload your app to App Store Connect.
- Metadata Matters: You need high-quality screenshots for multiple device sizes and a clear privacy policy URL.
- Review Timeline: Most apps are reviewed within 24–48 hours after submission.
Where to Start: Submitting an iOS App to the App Store
Submitting your iOS app to the App Store is the final stage of development. By now, the app should already be built, tested thoroughly, and you should have an app name that you’re confident in using.
If your app is still in development, there’s nothing wrong with looking ahead toward the App Store submission. Just know that it’s too early to take any of these steps. Apple won’t approve any unfinished apps to the store, even if you have all of the other app information required for the listing.
Consider these legal prerequisites before launching:
- GDPR Compliance: Required for apps launched in EU markets.
- PCI Compliance: Necessary if you are collecting payments directly.
- Data Handling: Ensure you follow official Apple Guidelines regarding user data sharing.
- Content Rights: You must own or have licenses for all content within the app.
App submissions must only have content that was either created by you or that you have the proper authority to use. If you’re using content from another source without the proper legal licenses or permissions, it can be grounds for either rejecting your app from the App Store or getting it removed from the App Store.
You’ll need to have an Apple Developer account and Apple ID as well. Submitting your app from a computer running on macOS is not a requirement, but it’s definitely common considering the software and tools you’ll be using.
For example, if you’re using Xcode to create iOS apps for iPhone and iPad, you can take steps to prepare your app for publishing directly in the IDE.
App Store Submission Requirements
Before we get into the steps required for publishing, you need to understand the App Store guidelines for app submission.
You can review all of the App Store review guidelines here. These are some important points to keep in mind:
- Developers are responsible for making sure everything in the app complies with Apple’s guidelines, including analytics services, third-party SDKs, ad networks, and more.
- Attempting to cheat the review system or manipulate ratings is grounds to remove your app and kick you out of the developer program.
- You must comply with Apple’s guidelines regarding apps for kids.
- Apps may not include objectionable content (discrimination, explicit materials, etc.).
- The app’s privacy policy must comply with all Apple guidelines.
- Apps must be complete and fully functional before you submit them for review.
- Apple has certain technical requirements and software standards that must be followed.
- You may not just copy another app and make subtle changes to pass it off as your own.
- Apps must have minimum functionality that goes beyond a mobile website.
| Category | Focus Area |
|---|---|
| Safety | Content moderation, data security, and user protection. |
| Performance | App speed, bug-free functionality, and hardware compatibility. |
| Business | Subscription models, in-app purchases, and advertising. |
| Design | User interface quality and adherence to Apple’s aesthetic standards. |
| Legal | Privacy policies, intellectual property, and regional laws. |
So give yourself ample time to review this document in detail before you go through the steps for submission.
6 Steps to Submit and Publish an iOS App
The App Store publishing process can be summarized in just six steps.
- Sign up for the Apple developer program
- Prepare the app for submission
- Create a listing via App Store Connect
- Capture App Store screenshots
- Upload the app using Xcode
- Submit the app to be reviewed by Apple
We’ll cover each step in greater detail below:
Step 1 — Join the Apple Developer Program
You must be a member of the Apple Developer Program to submit an app to the App Store. So if you haven’t done so already, sign up for an Apple developer account.
If you’re enrolling as an individual or sole proprietor, you can sign in using your Apple ID and enable two-factor authentication. Apple will ask you for some personal information, like your legal name and address.
To enroll in the developer program as an organization, you’ll also need an Apple ID with two-factor authentication enabled. In addition to the Apple ID, enrollment requires:
- D-U-N-S Number
- Legal Entity Status
- Legal Binding Authority
- Website
Just click “Start Your Enrollment” on this page to get started.
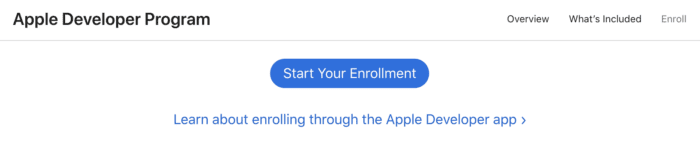
The membership pricing starts at $99 per year, and it gives you access to other exclusive Apple developer tools and services.
You can use the account to manage your apps for iPhone, iPad, Mac, Apple Watch, and Apple TV. The membership also comes with beta software, app analytics, testing tools, and everything you need to manage your App Store listing.
Apple developers also have access to TestFlight—a way to collect feedback from up to 10,000+ testers before submitting the app to the App Store. You can invite them with an email address or public link.
Step 2 — Prepare the App for Submission
Identifying bugs and problems with your app before submitting it to the app store is just one aspect of app development. There are other things you must do to get it ready for review.
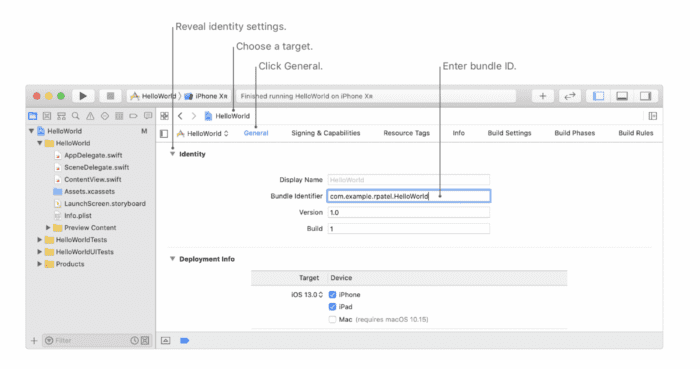
First, you need to set the bundle ID in Xcode. This is used to uniquely identify your app in the system. Xcode will give you a default identifier when you create a project from a template, but it’s important to create one that’s unique. Just be aware that you cannot change the bundle ID after it’s been uploaded to App Store Connect.
You can adjust these settings in the “General” menu of your project editor in Xcode.
Next, you need to configure your app version number and build string. The version number will appear in the App Store, and it’s expected to be in a format of [Major].[Minor].[Patch], such as 9.12.1.
Apple requires you to set an app category with your submission. This is designed to help users discover your app in the App Store. Options include:
- Books
- Business
- Developer Tools
- Music
- Medical
- Navigation
- Education
- News
- Finance
- Photo & Video
- Productivity
- Food & Drink
- Reference
- Games
- Graphics & Design
- Shopping
- Social Networking
- Lifestyle
- Sports
- Kids
- Travel
- Magazines & Newspapers
- Utilities
- Weather
Primary categories must match the primary purpose and function of your app. Choosing a category that doesn’t fit your app’s functionality is against Apple’s guidelines and grounds for removal.
You need to prepare an app icon and provide a launch screen as well. The launch screen is the UI that appears when your app launches and quickly disappears when the first screen loads. The purpose of a launch screen is to enhance the UX by offering some visuals while the app is loading.
Review all of Apple’s official guidelines to prepare your app for distribution.
Step 3 — Create a Listing via App Store Connect
The App Store Connect is where members of the Apple Developer Program can upload apps, submit apps, and manage apps post-launch. It comes with everything from sales reports to analytics, test resources, and more.
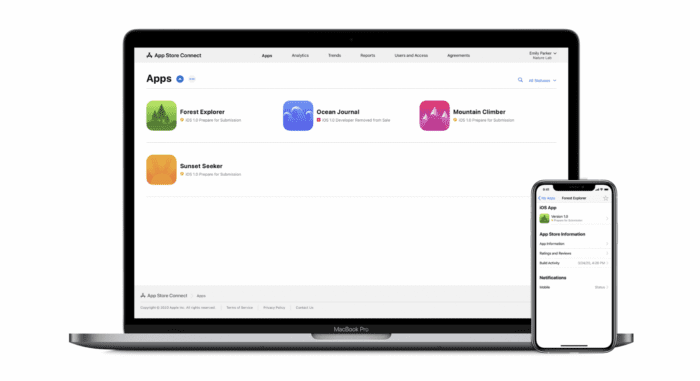
Here’s a quick overview of how to create a listing for App Store Connect:
- Log into your account
- Select the “+” button from the “My Apps” menu
- Add the platform (iOS), primary language, bundle ID, and SKU
- Add the app name and category
- Provide a URL to your app’s privacy policy
- Choose your app’s pricing
You’ll also have the option to decide how your app is released after the review information is approved.
You can manually sign back into App Store Connect and release it when you’re ready, or set it to be published on a certain date (assuming it passes certification). Apple gives you the option to select the app to be released immediately following its approval as well.
Note: These same steps work whether you have an App Store Connect Organization account or Individual account.
Step 4 — Capture App Store Screenshots
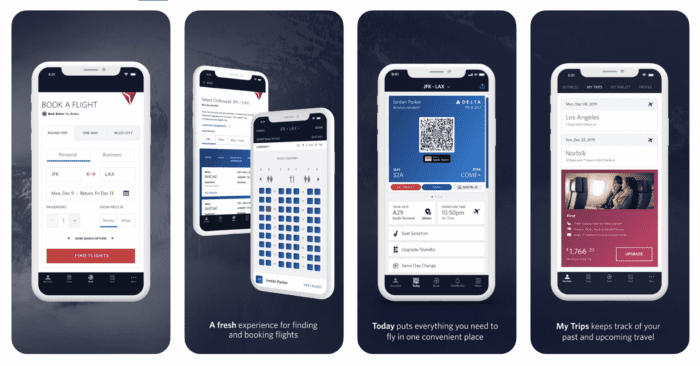
Now it’s time to prepare your screenshots for the App Store. There are two basic approaches here that you can follow. You can either use raw screenshots from your app or use a mockup template to showcase your app.
These screenshots are the perfect way to help showcase to the world what your app does and how it works when they find you in the App Store.
Here’s an example of how Delta Airlines uses app screenshots to showcase its top features:
Apple does have a lot of different screenshot specifications for app previews that you must take into consideration. That’s because they have so many different devices on the market.
iPhones range from 4.7-inch screens to 6.5 inches. iPads range all the way up to 12.9 inches.
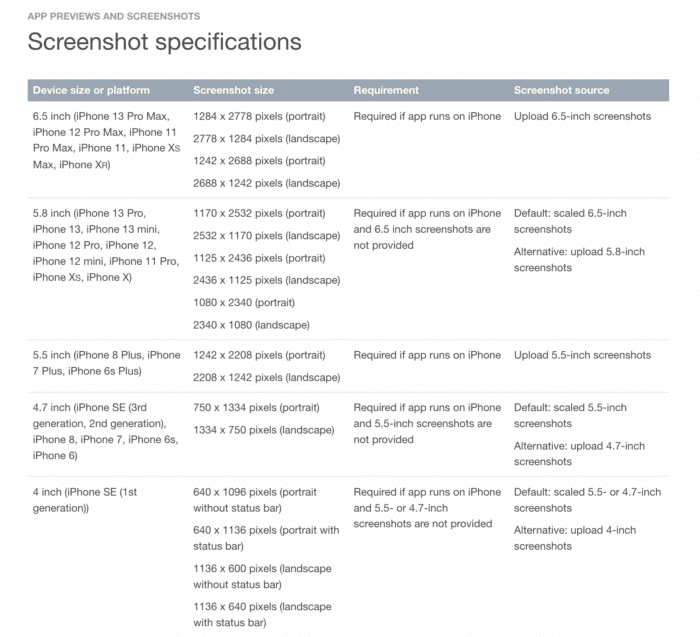
You can view all of Apple’s screenshot specifications here. I also recommend reviewing this API collection resource for app screenshots for more technical requirements.
Step 5 — Upload the App Using Xcode
Now it’s time to actually upload your app from Xcode. Do not proceed with this step until you’re confident that the app is free of bugs and it runs as intended. If the app doesn’t function, it won’t get approved for the App Store.
For new apps, the version should be set to 1.0.0.
Xcode 11 makes the publishing process really easy. In the past, lots of extra steps were required. But not most of the work now gets handled in a couple of clicks.
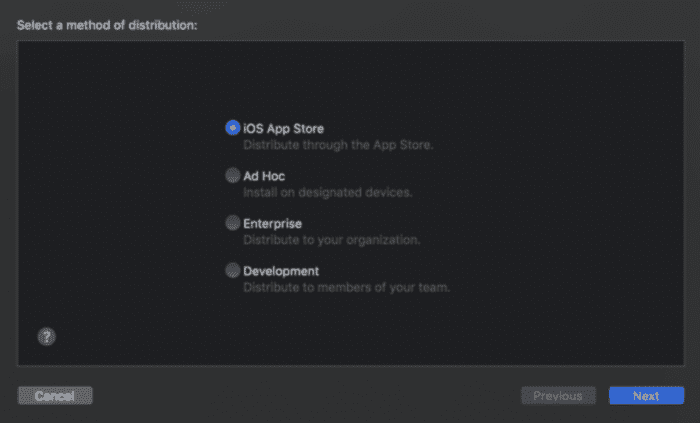
Start by creating a full app archive. Go to your list of simulators in Xcode and select “Generic iOS Device” from the menu.
Then select “Product” and “Archive.” This will prompt Xcode to bundle your app. Depending on the size, this could take quite a bit of time.
Once this process is complete, just go to the “Archives” tab, and click “Distribute App” on the right side of your screen. Then select “iOS App Store” when it asks for your method of distribution.
Xcode will go through a few steps to ensure you’re not trying to upload a broken app. If something is missing or there’s a problem, Xcode will likely stop the upload and ask you to add missing assets.
You should see some type of confirmation on the screen when the upload is successful.
Step 6 — Submit the App for Review
By now, the archive from Xcode has been sent to App Store Connect. But you still might have to wait until App Store Connect actually processes the upload. So don’t freak out if it’s not showing up in your account right away.
You should get an email when the archive is officially processed and ready for you. This can save you some time so you don’t have to keep manually checking.
Once it’s available, just select the archive and click the “Submit for Review” button at the top right of the page.
According to Apple, 50% of mobile apps get reviewed within 24 hours and 90% are reviewed in 48 hours. So assuming your submission is complete, there’s a good chance you’ll have an answer within two days.
The app’s status will get updated upon review, and you’ll receive a notification with the status change.
Conclusion
Publishing an iOS app and going through the Apple review process might seem a bit intimidating, especially if you’ve never done this before. But if you create an app with BuildFire, we’ll handle the publishing process on your behalf. This is the easiest way to publish apps.
You’ll still need to create your own Google and Apple Developer accounts, but our team will handle the majority of the heavy lifting. So you won’t have to worry about most of the steps in this guide.
If you’re still in the planning stages of your app project, request a consultation to see if BuildFire is the right partner to achieve your goals.