App testing is a key part of iOS app development. If you’re using Xcode to create an iOS app, you can test your app using a real iPhone and iOS device with Xcode’s built-in simulator.
Key Takeaways
- Simulator vs. Real Device: Use simulators for early unit testing, but switch to real devices for UI/UX and hardware features like the camera or SMS.
- Hardware Requirements: Testing requires a physical connection between your iPhone and a Mac running Xcode.
- Configuration: You must add your Apple ID to Xcode accounts and register your device if you are in the Apple Developer Program.
- Debugging: Xcode’s built-in debugger allows you to monitor variables and resolve errors in real-time while the app runs on your phone.
While simulators are great, some features don’t quite work the same unless you’re using an iPhone.
For example, maybe you want to send an SMS message from your iOS application. Or maybe you want to test the app’s compatibility with an iPhone camera. You can’t do this from your Mac.
In addition to testing for functionality, running your app on an iPhone for the first time can also help with debugging. Xcode even has a built-in debugger tool that helps you identify bugs and problems directly within the source editor.
Ready to start testing your iOS apps? This guide will show you how.
What is Xcode?
Let’s start with the basics. If you’re new to development and haven’t started building anything yet, you might have some questions about Xcode and how it works.
We have an in-depth tutorial on how to code Xcode that’s written for complete beginners. I strongly suggest giving it a read for a full explanation of how Xcode works. But I’ll quickly summarize the key highlights below before we continue with the testing instructions.
Xcode is an integrated development environment, better known as an IDE. It’s the official IDE for Apple that’s used to create, test, and debug apps for iOS devices, including iPhone, iPad, Apple Watch, Mac, and Apple TV.
Xcode is also great for team collaboration. So your entire development team can work together on the app and ensure it’s ready for testers before deployment. It’s much easier to use Xcode for testing and debugging apps before they’re added to the app store.
Testing on a Simulator vs. Real Device
App development isn’t complete until the application has been fully tested. There are several different ways to test mobile apps, but these options can generally be segmented into two categories—simulators and real devices.
| Feature | Simulator | Real iPhone/Device |
|---|---|---|
| Best Use Case | Early development & unit tests | Later stages & UI/UX testing |
| Hardware Access | No (Camera, SMS, Sensors) | Yes (Full hardware access) |
| Performance | Simulated (Mac resources) | Actual (Device resources) |
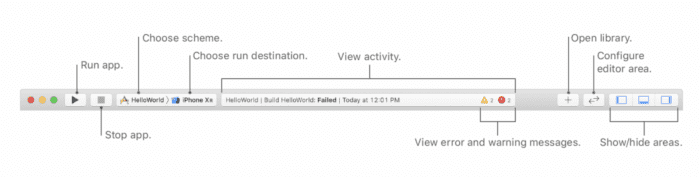
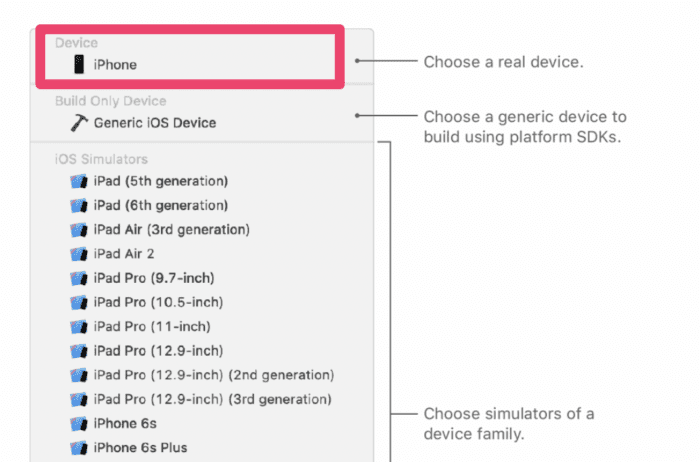
You just need to configure your settings and click the run button on your toolbar.
Then select what type of device you want to simulate your app on. This can be selected from the run destination menu of the toolbar.
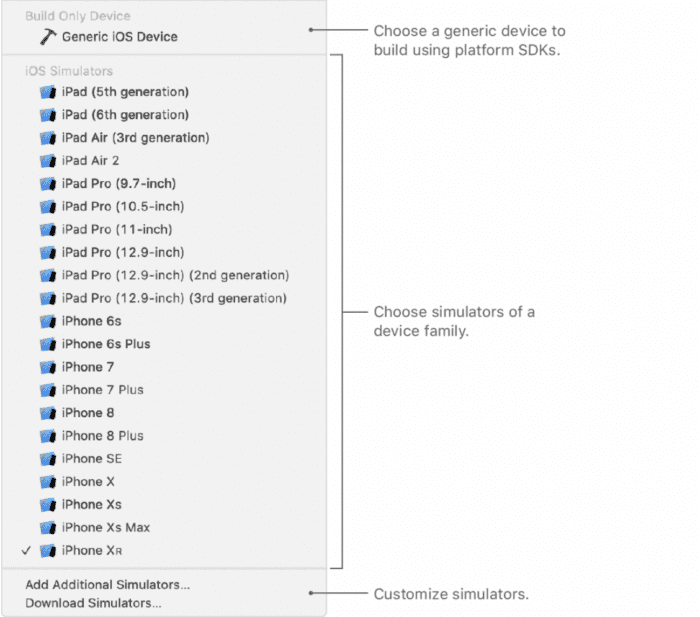
If you want to test the app using an older iOS version, you can click “Add Additional Simulators” at the bottom of this pop up menu.
Again, simulators are fine for certain aspects of testing—especially in the early stages. But they can’t really show you the user interface and how your app flows when it’s really being used on a device. That’s why you’re better off testing on an iPhone in the later stages of development before the app gets pushed to the App Store.
Simply put, simulators aren’t ideal if you need to run a UI test. But they’re fine for running unit tests, which verifies that the code written will work as it’s expected to.
Setting Up to Run Xcode On a Real Device
Before you test your mobile app on an actual iOS device, you need to make sure that everything in your Xcode project is configured properly. Then you’ll be able to run the app on an iPhone without having to write any extra code.
Grab your device, and connect it to your Mac.
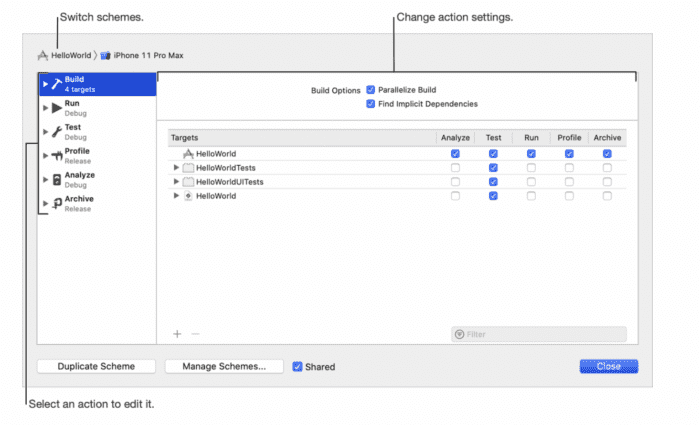
If you’re testing a macOS version for an iPad application, then you’ll also need to choose a scheme. Xcode app schemes are essentially settings that clarify the build configurations, targets, and executable environment.
To choose a real device for testing, you’re going to follow the same steps you took earlier for selecting an iOS simulator. Only this time, you’re going to choose the connected iPhone from the run destination menu for device management in Xcode.
Similar to what we described earlier, you’ll just click the run button to proceed after you’ve selected the connected iPhone.
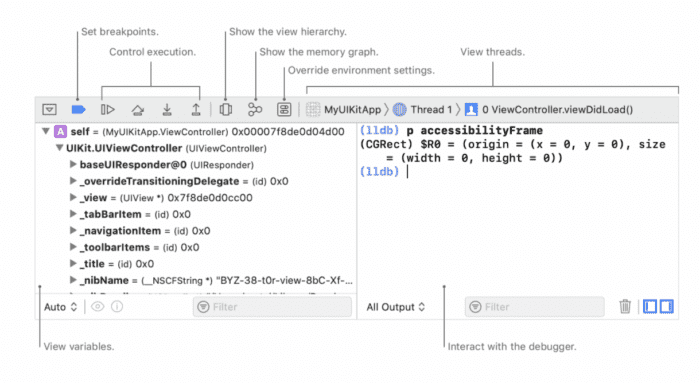
With the device connected, Xcode will automate the process, install the app, and attach the debugger. Once this happens, the app should appear on your phone. From here, you can navigate to the debug area of Xcode to test your app. This is an opportunity for you to examine variables and debug any errors.
If your build is unsuccessful, you can view any error messages or warnings in the Issue Navigator. You can do this by selecting “Navigators” from the “View” menu and choosing “Show Issue Navigator.” Any messages will appear here.
How Do I Test My App on My iPhone?
Here’s a quick summary of the requirements for testing apps on iPhone using Xcode:
- You need to plug the iPhone into the Mac that’s running Xcode.
- Then you must download the app to your Mac.
- When you select a real device in Xcode for testing, you need to add your Apple ID in the Accounts preferences of your project editor.
- If you’re part of the Apple Developer Program, you must register the device before running the app.
- You can also pair Xcode with iOS and tvOS apps if that device is on the same network as Xcode. When you open Xcode, any paired devices should appear on the toolbar.
Final Thoughts on Using an Xcode Test App on iPhone
I hope you found this tutorial on testing your Xcode app on iPhone helpful.
To bypass these steps and avoid unnecessary headaches, you can use Buildfire as an alternative solution. The Buildfire SDK is developer-friendly—allowing you to create new app features using Javascript, HTML, and CSS using your preferred framework.
Buildfire gives developers the ability to build on top of our existing infrastructure, which saves a ton of time and money during the Apple development process.
If you’re a complete beginner who doesn’t have any coding experience, there’s really no reason to learn Xcode and test your apps on your own. Unless you want to become an iOS developer, it’s much easier to let Buildfire create an app for you. Check out our full-service app development solution, Buildfire Plus, for more information.
For those of you who are still early on in the development process, read our step-by-step guide on How to Make an App to learn more.
Frequently Asked Questions
Should I test my app on a simulator or a real iPhone?
Use simulators for early unit testing — they are fast and convenient. Switch to a real device for UI and UX checks and anything touching hardware, like the camera or SMS, because those do not behave the same in a simulator.
What do I need to test an app on my iPhone?
A physical connection between your iPhone and a Mac running Xcode. You also need to add your Apple ID to Xcode’s accounts, and register the device if you are in the Apple Developer Program.
Why can’t I test camera or SMS features on a simulator?
Simulators run on your Mac, which does not have an iPhone’s hardware. Sending an SMS or using the iPhone camera can only be tested properly on a real device.
Can I debug my app while it runs on my iPhone?
Yes. Xcode’s built-in debugger lets you monitor variables and resolve errors in real time while the app runs on the connected phone.