The design components are crucial to the success of your mobile app.
You should be thinking of your app as a product. Consumers don’t want to buy something if it has a subpar or incomplete design.
Well, the same applies to your app. If the design isn’t done well, then users won’t have an enjoyable experience, which will impact your bottom line.
For iOS apps, Auto Layout is a great design tool for advanced animations.
Key Takeaways
- Importance of Design: A well-designed app enhances user experience and impacts profitability.
- Auto Layout Benefits: Essential for creating advanced animations in iOS apps.
- Handling Changes: Auto Layout adapts to both internal and external changes, maintaining animation integrity.
- Constraints Complexity: Advanced animations require careful management of constraints to avoid confusion.
- Alternative Methods: For complex animations, consider using containers and manual framing instead of constraints.
In a perfect world, you want to be able to design without too many restrictions.
It’s possible that you may have done some simple animations before as a developer or even as a designer. If so, you were probably able to get away with just updating constraints and animating.
For basic animations, this strategy is sufficient. But for more advanced animations this tactic doesn’t work as well.
If you’ve been searching for other Auto Layout guides on the Internet, you’ve probably seen the same instructions over and over again.
I decided to dive in a little bit deeper on this topic and cover advanced animations.
But before I get to that, I’ll give you some useful and informative tips about Auto Layout.
Let’s get started.
Quick overview of Auto Layout
Auto Layout controls all of the view layouts for iOS development.
It can calculate the position and size of each view in your hierarchy based on the specific constraints.
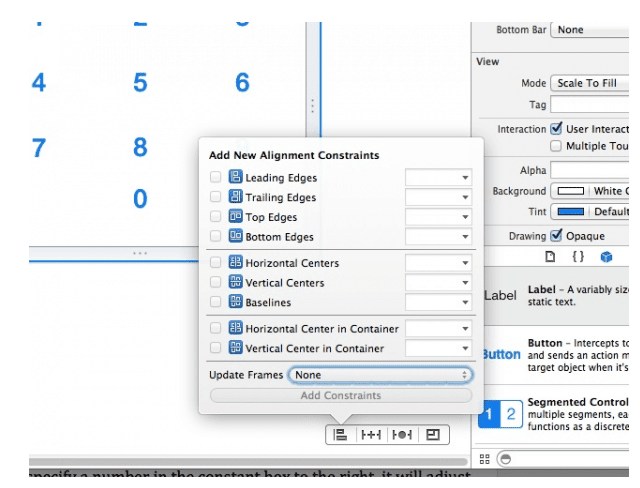
So let’s say you constrain a button in your app so it’s centered vertically in the image view. You want the bottom edge of your button to always stays six points above the bottom of the image.
Sounds reasonable, right?
Well if the position of the view size of the image changes, then the position of the button will adjust automatically so it matches.
Here’s what it will look like when you’re aligning your constraints.
Lots of developers use Auto Layout for all of their projects because it’s such a great tool. It’s extremely powerful with so many functions.
Overall, it’s pretty easy to comprehend as well. The visual elements of Auto Layout show you how everything will look and be positioned on the screen.
That’s why it’s one of the best tools for crafting advanced animations.
When you’re creating animations, it’s also important for you to keep external changes in mind.
What’s an external change?
This occurs when the user performs an action that alters the size of the screen, such as rotating their device.
External changes also occur if your app is being used on Split View on an iOS iPad. The size of the screen changes if there is an active call happening as well.
Another example of an external change would be if the user resized their window on an OS X device. But if your app is specifically for phones and tablets then you don’t need to worry about that.
Internal changes happen if the size of the controls or the views in the user interface are modified.
This will happen if the app supports internationalization or the content that gets displayed by the app changes.
With internationalization, your app would be supported by different languages. So when content gets translated, the space required on the screen will change as well.
Your previously defined constraints will determine how your app responds to both internal and external changes.
Any changes on the screen would impact your animations. Auto Layout takes care of this.
Learning how to animate with constraints
Let’s start with the basics.
As I just briefly showed you with the example and basic image above, constraints are the easiest way to animate in Auto Layout.
If you’ve used Auto Layout before, you probably already have some sort of familiarity with this concept.
You need to modify the constraints in your view. To do this, you just need to change the properties, create constraints, or delete them.
However, with advanced animations, it’s not always easy to keep track of lots of constraints. If you’re just animating one or two buttons, you won’t get confused.
But when you have a bunch of constraints for your advanced animations it can be overwhelming when you look at this on your storyboard.
| Animation Method | Pros | Cons |
|---|---|---|
| Constraints | Easy for simple animations, integrates with Auto Layout | Complex for advanced animations, can become overwhelming |
| Transform | Doesn’t alter layout, good for basic animations | Not suitable for advanced animations |
Here’s why.
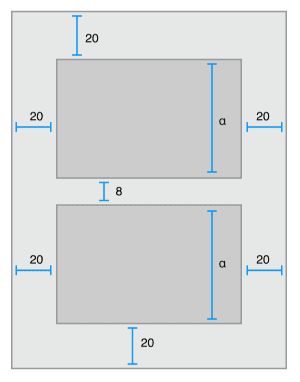
For example, let’s say you want to animate something in a different position on the screen. Well, each position affects the layout and other views.
Each time you add a position, you need four constraints.
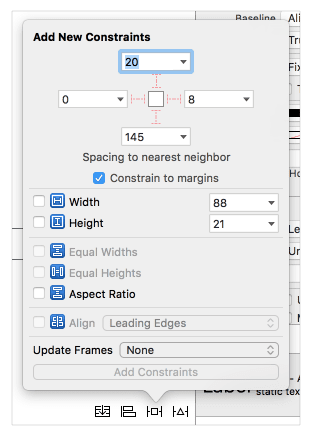
But now that you’re configuring this animation for a second position, you’ll need an additional four constraints. Now you’re already up to eight constraints for just one image view in two different positions.
Other views will also get affected by these constraints, depending on the interaction. So if this interacts with just one more in each state, that brings us to ten constraints.
If you decide that you want to animate a second view, this will quickly double to 20 constraints. What we’re talking about here isn’t even that complex yet.
Can you see how all of these constraints will quickly escalate and become too complicated to keep track of on your storyboard?
That’s why you’ll need to figure out alternative methods if you want to use Auto Layout for advanced animations.
Use UIView to animate with transform
From the UIView you can locate the transform property if you want to create a basic animation. This is great for animations that don’t alter the layout of your screen.
Transform animations are made for views with an animation but don’t change positions.
This makes things a little bit easier for you. You’ll still have the ability to rotate the view or scale the animation.
It’s great for things like making buttons move or bounce when they get clicked. You could also use this method for making icons that wiggle.
I use transform in the UIView to make text shake, such as when a password is invalid.
But again, these are all pretty basic functions and features of Auto Layout. It’s not ideal for creating advanced animations.
Creating advanced animations
As we already discussed, constraints and transforms are both great ways to create simple animations in Auto Layout, but neither will work for advanced animations.
You don’t want to modify constraints because it will impact the layout of all the other elements of your animation.
Transform won’t impact the layout the same way constraints will, but it’s just not made for anything too advanced.
So what should you do?
First, create a container in the view controller for each element.
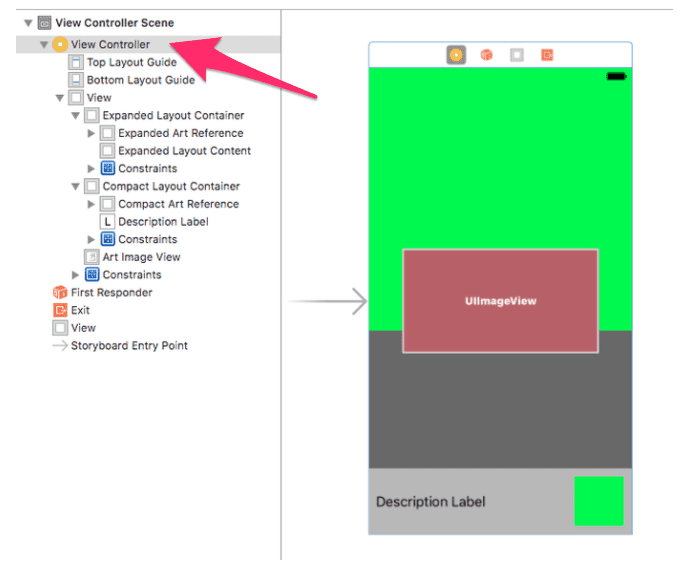
Each container should have a static layout with every element that doesn’t need to be animated.
Next, create an invisible view to represent the frame of each element. Add these elements back to your main view, but don’t include any constraints.
nstraints here, you’ll need to frame them manually.Then you’ll need to calculate the animation based on a specific action, such as when the user moves their fingers.
So how do you know if your animation is complex or advanced?
Well, think of complexity in terms of anything with multiple animated elements.
Another way to figure out if your animation is advanced is by trial and error. If you start adding constraints and it becomes too difficult to track, then you may need to start over with a different approach.
This isn’t the most efficient method, especially in terms of your time.
But if you’re new to designing and working in Auto Layout, this might happen to you more often than you’d like. That’s OK. Like anything else, experience will come with time and effort.
As you continue to create more and more animations you’ll be able to tell which ones require a little bit more attention due to their complexity.
Conclusion
Auto Layout is one of the best tools for you to design animations for your iOS app.
For simple animations, it’s easy to use constraints or UIView with transform to animate.
But that just isn’t realistic for advanced animations. The constraints will start to pile up, which will overwhelm your storyboard and get too confusing to keep track of.
Instead, you’ll need to create a container in the view controller for each element of the animation.
sible view to represent the frames, you’ll need to frame everything manually. Then you can calculate the animation based on certain actions. If you’re just getting started building your app and need some help, the Buildfire team can create a customized app for you. Just reach out and tell us what you’re looking for. Otherwise, you can continue learning the different components of Auto Layout to craft animations. What kind of advanced animations are you building with Auto Layout?Frequently Asked Questions
How does Auto Layout handle external changes in iOS apps?
Auto Layout automatically adjusts the layout when external changes occur, such as device rotation or split view usage, maintaining the integrity of animations.
What alternatives exist for creating advanced animations without constraints?
For advanced animations, consider using containers and manual framing instead of constraints.
Why is transform not suitable for advanced animations?
Transform is limited to basic animations that do not alter the layout, making it unsuitable for complex animation sequences that require layout changes.